Blog

Rigidbody Sleep Toggle – Unity Asset Store

January 6, 2011 by Devin Reimer

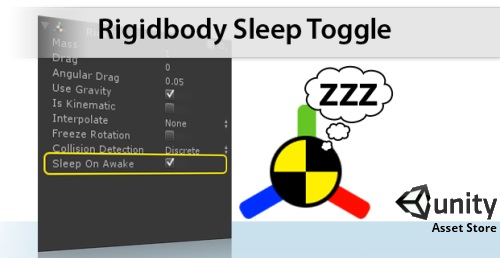
I’m happy to announce ‘Rigidbody Sleep Toggle’ is now available in the Unity Asset Store. What is ‘Rigidbody Sleep Toggle’ you ask? It’s an additional toggle (checkbox) called ‘Sleep On Awake’ that is placed at the bottom of the Rigidbody inspector. Clicking this checkbox automatically adds a custom component that makes that Rigidbody sleep at the start of the scene. This is sometimes very important to increase start up performance of your game. If your scene has lots of Rigidbodies they will all be in motion at the start of the game so preventing this can crucial.

While you could add a custom script yourself, this script not only saves time (just selecting/unselecting a checkbox), you can easily tell from within the Rigidbody component if it will be asleep at the start of the scene.

I have also added a menu option under ‘Edit’ that will allow you to in bulk make all Rigidbodies in your scene sleep on awake.

Now onto the best part, it’s now available in the Unity Asset Store for the low, low price of FREE.

Happy New Year Everyone! Please use the comment section below to let me know if you find it useful.

Note: If you don’t know how to use the Unity Asset Store, simply open up Unity, click Window->Unity Asset Store. You can find this item under ‘Extensions’.

Update: New link to Rigidbody Sleep Toggle: http://u3d.as/content/almost-logical-software/rigidbody-sleep-toggle/1tj.
Also I have now launched a new extension called PlayModePersist read about it here.

Unity3D Parachute – Cloth, Joints and Physics

November 2, 2010 by Devin Reimer

When I first received the Unity 3.0 Beta one of the first things I played around with was the new cloth physics. What better way to learn something than to make a tech demo. After some thought I decided on creating a parachute.

One thing I quickly discovered about the new cloth physics within Unity was that it is very heavy (requiring a lot of computing power). That means for the most part cloth physics are slow. So before you go off and try to create a game with lots of physics based cloths you have been warned, it will probably end up being too slow. While cloth does have its uses, they are a little more limited than I had hoped.

My original plan for this demo was to build a parachute using only cloth physics. I ended up having to tweak this a bit for performance reasons. Since in real life a parachute moving downward is fairly rigid so I instead opted to only swap in a physics based cloth once the parachute’s payload touches the ground. The rest of the time I would use a normal mesh renderer. This way I can get the parachute to collapse nicely over the payload but only use the physics aspect for a short period of time.

The parachute’s movement is completely driven by the physic system. A configurable joint is used to attach the Rigidbody of the parachute to the payload (in this case a crate). A physics force is then applied to the parachute based on the maximum amount of lift that parachute is capable of. This way if you increase the mass of the payload the parachute will fall faster and on the flip side a payload of less mass will fall slower.

I ended up leaving the Interactive Cloth’s options pretty much unchanged as changing some of them ended up impacting performance too much. The parachute’s cable are dynamically generated using LineRenderers.

This example is built is such a way that you should easily be able to attach whatever you would like as the parachute’s payload.

To check out the demo click here.

To get the source (unitypackage) click here.

Source Requirements: Unity 3.0

Thanks again to Calin for creating the models.

iTween Parameter Code Hinting

September 13, 2010 by Devin Reimer

For those who don’t already know, iTween is a great tweening library for Unity. If you haven’t yet had a chance to use it, go download it. I guarantee that you will find it useful.

Now that introductions are out of the way, on to the point at hand. Many code libraries (especially tweening libraries) have the problem that there is no access to code hinting for properties being passed into it’s functions. The reason being since there are so many possible parameters that could be past into each function a list of optional parameters are requested instead of a sequentially list of required parameters. This makes using these functions a lot easier and more customizable. The downside is there is no coding hinting for what  parameters could be possible passed in.

In the case of using iTween in C# you pass arguments into a Hashtable and that Hashtable is then in turn passed into the these functions.
Example:

Hashtable tweenHash = new Hashtable();
tweenHash.Add("x", -5);
tweenHash.Add("y", 5);
tweenHash.Add("time", 10);
iTween.MoveAdd(gameObject, tweenHash);

Or as a single line (if using Unity 3.0 or greater):

iTween.MoveAdd(gameObject,new Hashtable(){{"x",-5},{"y",5},{"time",10}});

Or an even shorter single line (does have additional creation overhead)

iTween.MoveAdd(gameObject,iTween.Hash("x",-5,"y",5,"time",10));

The only way to know what the list of possible parameters are for a particular function is to either a) open iTween’s source and look at the comments or b) look through the iTween documentation.

Since this slows down learning and speed of using a new library I set off to try to find a better way. After exploring some different options I think I have found a better way. I wrote an app that goes through the iTween library and creates a Helper class called iT (contained within iTweenHinting.cs). Using this class you will have the ability to access code hinting/discovery when using iTween.

For example:

Hashtable tweenHash = new Hashtable();
tweenHash.Add(iT.MoveAdd.x, -5);
tweenHash.Add(iT.MoveAdd.y, 5);
tweenHash.Add(iT.MoveAdd.time, 10);
iTween.MoveAdd(gameObject, tweenHash);

Or as a single line (if using Unity 3.0 or greater):

iTween.MoveAdd(gameObject,new Hashtable(){{iT.MoveAdd.x,-5},{iT.MoveAdd.y,5},{iT.MoveAdd.time,10}});

Or even shorter single line (does have additional creation overhead)

iTween.MoveAdd(gameObject,iTween.Hash(iT.MoveAdd.x,-5,iT.MoveAdd.y,5,iT.MoveAdd.time,10));

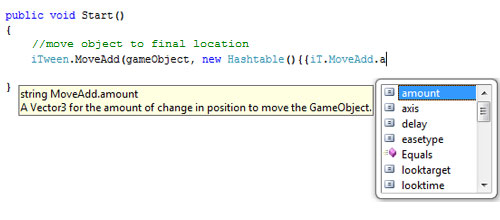
When you type ‘iT.’ within a code editor it will give you a list of all tweening functions within iTween. Once you select the function you wish to use (ex: MoveAdd), hit ‘.’ and your code editor will then give you a list of all possible parameters for that function (see image above).

The great thing about this method, is as you get more comfortable with the iTween you can write out the strings of the simple and easy to remember parameters, while still having the ability to fallback on the helper class.

To download iTweenHinting.cs click here (right-click save as).

Note: While I don’t expect the list of functions and parameters within iTween to change that often. I will do my best to keep iTweenHinting.cs up-to-date.

If you have any suggestions on ways I could improve/change iTweenHinting.cs please leave them in the comments below.

Interesting side note: For this project I wrote code that reads code to write code that allows you to write code faster. Plus it was AS3 that was reading and writing C#. Isn’t programming fun. :)

Unity Game Development Essentials – Book Review

September 10, 2010 by Devin Reimer

Longer ago than I would like to admit Packt Publishing contacted me and asked me if I would be willing to review one of their books (‘Unity Game Development Essentials‘), if they sent me out a copy. I agreed, but since I live in Canada they weren’t able to send me out a copy due to the additional shipping costs. Instead they offer to send me out a pdf copy.  I knew it would take me longer to read the book in pdf format (as I hate reading long things on a computer), but I didn’t think it would end up taking me this long. I ended up getting really busy and good book reviews were already being put up online (Everyday 3D and drawlogic to name a few). So finishing reading this book got put on the back burner. I didn’t feel that bad as Packt sent me a pdf, so it didn’t really cost them anything.

That all being said, it was bugging me that I said I would do something and I hadn’t. So the other day I thought it might be good to do a quick book review keeping in mind the Unity 3.0 beta I’ve been playing around with. The reason being that one thing I worry about when buying a book is where or not it will be too out-of-date.

Better late than never, so now onto the actually book review.

First off this is a good book that covers a lot of ground. If you are new to Unity you will learn a lot of from it. It doesn’t suffer from going to fast but is still able to cover everything it needs to. I found the chapter on Particle System particularly well done.

One important thing to point out is this book should not be mistaken as a book for programmers.  This book assumes you know almost nothing about coding and what code is in the book is pretty limited. The code within this book also isn’t always the best when it comes to coding practices (for simplicity). But this is alright if you are new to Unity as there are a lot of things to learn before you can write much code anyway. Just be aware that if you are a serious programmer there will be some sections you might want to skim.

All coding examples in this book are wrote in JavaScript(UnityScript), so as Bartek also pointed out in his review you might find it helpful to translate the code to C# as you go. Not only does this help you understand the code instead of suffering from “copy and paste syndrome” but I do believe that C# is the best language to be coding Unity in.

From a Unity 3.0 Beta standpoint, you should have no worries about this book being too out-of-date. Almost all new things within Unity 3.0 are additions and not changes, so this book will still help you build your Unity skill set.

My only other comment is I found it a little odd that Chapter 2 is focuses on Terrain. I feel that there is a lot of other items that probably should be covered first. That being said I do understand that the reason it is introduced so early is so there is a platform to build upon in the following chapters.

Overall if you are new to Unity and are looking for a book this is one you should definitely check out.

Link to: Unity Game Development Essentials

Adding Text-To-Texture at Runtime in Unity3D Without Using Render Texture

August 20, 2010 by Devin Reimer

I was working on a library in Unity that was using a lot of 3D text and therefore was requiring a lot of draw calls. This got me thinking, since all the pieces of text were on the same orientation plane would there be a way instead to draw all the text to a one texture and render that instead. Another benefit of doing this would be you could then apply text at runtime to a non-flat mesh via a texture. This would allow you to do cool things like personalizing a player’s jersey with the user’s name, localizing complex in-game advertisements, etc. So I decided to look into this. What started as a few experiments turned into not so small project.

Doing research I found a way of achieving this using Render Texture. What you could do was by using either with GUI text or 3D Text place a camera to capture a single frame and render it to a texture. While not completely straightforward or easy it does work and allows quite a bit of flexibility on what you are creating. This method does come with a drawback, it needs Render Texture support. Only Unity Pro supports Render Texture, plus they are not supported on the iPhone (Unity Feature Breakdown).

Since my goal was to create a library that all Unity developers could use, this was not an acceptable solution.

My next idea was to manually draw the text to a texture using SetPixels. While the performance of writing to a texture using SetPixels is less than ideal, I only needed to do this once.
Note: The reason why this is so slow is after calling setPixel(s) you have to call Apply which send the whole texture to the GPU. The Apply method is unfortunately very slow, but is “usable” if you are not needing to call it repeatedly.

I thought developing this using this method shouldn’t be too bad as I knew when you import a font into Unity, Unity automatically creates a texture containing the font. What I didn’t anticipate was that the letters were not in a grid format, but places tightly together. With no runtime access to letter position data, this was not going to work.

Next on my list was Custom Font, a feature where you can “easily” create your own font in Unity. With Custom Font you supply your own font image laid out in a grid. Using this method I could determine where the letters were positioned. I now needed a way create a font image in a grid pattern and get all the Per Character Kerning values from a font.

In digging through the internet I came across a few mentions of something called the Unity Font Mapper. It took me a very long time but I finally tracked down a link to the app: http://loewald.com/unity/unityfontmapper.zip. This Mac application not only generates the font image in a grid pattern, but generates a file containing the Per Character Kerning information.

Once I had a Custom Font working I then discovered there is no programming access to any of its properties (I still use Custom Font as part of my final solution in hopes at some point access will be opened up to those values). This means these values now needed to be entered twice if you want to use the same font for both a Text-to-Texture font and as a regular font.

I now had all the pieces and it was just a matter of putting it all together. While the current version of this code is far from perfect and is missing features like colored text it does exactly what I wanted it to do.

To check out the demo click here.

To get the source (unitypackage) click here.

To get only the TextToTexture class (TextToTexture.cs) click here.

Source Requirements: Unity 2.6

Setup Steps

  1. Create a font image in a grid pattern and collect kerning values (either manually or using the Unity Font Mapper)
  2. Import the font image(texture) into Unity and select ‘Build Alpha From Grayscale’ and set ‘Is Readable’ to true.
  3. Add this texture to a material
  4. Within Unity create a Custom Font. If you aren’t wanting to use this font for anything but Text-to-Texture you can just setup the basics and ignore the Per Character Kerning values within the Custom Font (these take a long time to enter)
  5. Create a script that calls TextToTexture and passes all the required information (example in source: AddTextToTexture.cs)

Note: I used a Decal material in this demo so the text would appear on top of the primary texture. But you can use any material that you wish.

Real-time Terrain Deformation in Unity3D

June 10, 2010 by Devin Reimer

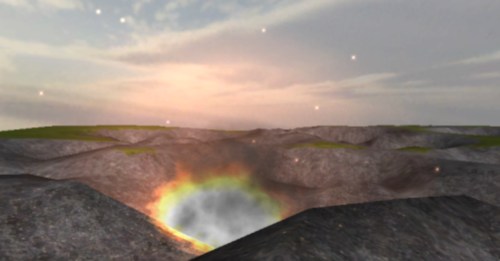
Real-time Terrain Deformation Screenshot

A few weeks back I got thinking. Would it be possible to have a terrain within Unity deform in real-time? For example if an explosion went off, could it blow a hole in the terrain? I decided this would be a good project to learn the more ‘advanced’ features of Terrains within Unity.

It ended up being more challenging than I predicted, as it was difficult to get the framerate to remain stable while performing these operation. Using a few tricks I ended up getting it to work exactly as I had hoped.

The demo works like this. A script randomly spawns ‘shells’ that fall quickly to the ground. Each shell has an onTrigger collider attached to it. If this collides with a terrain that has a TerrainDeformer component, the shell tells that component its location and the force of the explosion. The shell then instantiate an explosion (supplied by Ben Throop great Detonator framework), and removes itself.

The TerrainDeformer script then translates that position to the correct location relative to it’s terrain and modifies both the heightmap (terrain height) and the alphamap (terrain texture). A bit of math is used to find all the heightmap and alphamap position within the area of the impact circle.

The texture which is used to re-texture the impact area is chosen from the list of terrain textures based on the numerical index value passed into the script (Terrain Deformation Texture Num). In this example it is set to one, so it will re-texture with the second texture in the list.

When creating your own terrains it is necessary for the height of the terrain to be higher than 0 meters so craters can be formed. I recommend a depth of at least 3 meters. This can done by setting the terrain height to something higher than 3 meters, then clicking Terrain->Flatten Heightmap and entering 3 meters.

For performance reasons it is important to keep your terrain size small and more importantly keep your Heightmap Resolution low. In this example it is set to 33.

The current version does have limitations like lack of terrain edge detection and support for multiple terrains. This example is more of proof of concept to show that not only can it be done, but done without much of a performance hit.

Thanks to Calin for creating the dirt texture.

To check out the demo click here.

To get the source (unitypackage) click here.

Source Requirements: Unity 2.6 and the Detonator Framework.