Blog

Quickly Adding Custom Editor Scripts To New Projects in Unity3D

June 2, 2010 by Devin Reimer

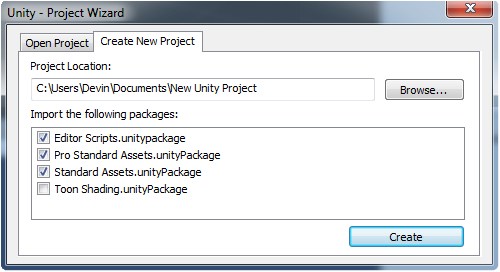
Import Editor Scripts Screenshot

A little annoyance I’ve come across when creating new projects was having to manually add my collection of custom editor scripts each time. Ex: TransformUtilitiesWindow

I found that every time I created a new project I would navigate to my last project and drag all the editor scripts from there into my new project.

I got thinking maybe there is a way to add these scripts to the ‘Import the following packages’ panel when creating a new project. Turns out you can do this fairly easily.

First create an empty Unity project. I called mine EditorScripts. Create a folder within this project and call it ‘Editor’ (editor scripts must be placed in this folder to work). Then drag into this folder all your custom editor scripts. Once complete click Assets->Export Package, and then click the Export button (all your scripts should be checked for them to export). You will then export this package to the ‘Standard Packages’ folder within Unity (Windows: C:\Program Files\Unity\Editor\Standard Package or OS X: /Applications/Unity/Standard Packages – reference link). Once the export is complete, save this project for later use.

Now the next time you create a new project you should see a new item in the ‘Import the following packages’ list (image above).  You can check this package and have those scripts automatically added to your new project.

As you find/create new editor scripts you can go back to the EditorScripts project, added them and re-export the package.

While I personally find this method most helpful for editor scripts, you can use the same process to create reusable and quickly addable packages containing any kind of assets.

So until Unity comes up with a way to share scripts across projects this seems like the easiest and quickest way to add editor scripts that you will need for every project.
Interacting with Animated Blender Models in Unity3D

March 24, 2010 by Devin Reimer

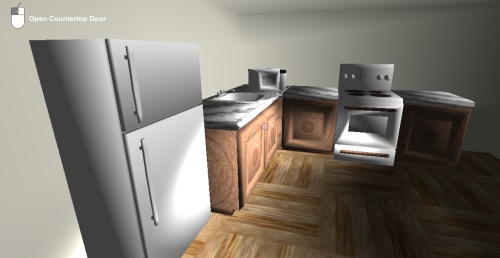
Interactive Environment Demo Screenshot

My last Unity3D example showed how to interact with a standard Blender model. The TV model in that example had no animations just a separate dial object that I manually rotated in Unity. In this example I wanted to trigger a Blender animation when an object was clicked.

My brother Calin was nice enough to create the required Blender models for me and animated them using an Armature.  For these models he set each animation to 25 frames in length (length of the animation is important to know as it will need to be entered into Unity).

After importing each model into Unity each animation’s  name, frame start and frame end will need to be entered.

Ex: open 0-25, close 26-50

Once a model is added to a GameObject the animation component can be setup. In this example the default animation was set to none and ‘Play Automatically’ was disabled. This way no animation would be played at start up. Each previously entered animation can then be added to the animation list.

Once complete the default collider(s) can be added to the GameObject. Also if needed colliders that will need to follow the animation’s motion can be added to that joint GameObject. (ex: fridge door joint). This way during and after the animation all colliders will be in the correct location.

Finally from within the GameObject containing the model with an animation you can call ‘this.transform.animation.Play(“animationName”);’ to trigger that animation.

While setting up each animation and all the colliders can be a little time consuming once you get the hang of it, it becomes pretty easy.

Thanks again to Calin for creating these models.

To check out the demo click here.

To get the source (unitypackage) click here.

Source Requirements: Unity 2.6, you will only need Unity Pro to use the Render Texture feature used for the TV.

Update: The original version of the unitypackage was missing the scene file. This has now been corrected.

Interacting with Objects Unity3D

January 4, 2010 by Devin Reimer

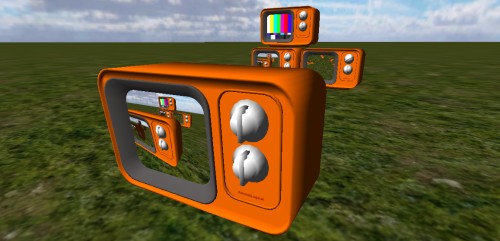
Interactive TV Demo Screenshot

If you missed the first part of this Unity3D series you can read it here.

This example demonstrates how to interact with with objects in Unity.

The mouse cursor was removed and replaced with a cursor in the middle of the screen similar to an FPS. When this cursor is over an object that support interactivity, the cursor changes and the GUI will display a message based on the possible interaction. This is achieved by creating an abstract class called ‘Interactive’ with two abstract functions GetInteractionMessage() and Interact(). All interactive objects will inherit this class and support these two functions.

Within the Update() in the GUI class a Physics.Raycast is done using a ray moving outward from the center of the screen. This returns the first GameObject in which this ray collides. Then it tests to see if this object or a parent of this object has a component of type ‘Interactive’. If type ‘Interactive’ is detected it then can retrieve information about the possible interaction or if the left mouse button is down tell this object to perform an action.

In this example clicking on each TV changes its channel (based on multiple materials) and rotates its dial.

As you may have noticed the TV model has received a significant upgrade. A thanks goes out to Calin Reimer for creating this new model.

Hints and Gotchas:

  • Use an abstract class as the parent class for all interactive objects, this way you won’t have to rewrite the basic interaction code for each object. This method also make detection a lot easier.
  • To create a Ray moving outward from the center of the screen, use the following code: Camera.main.ScreenPointToRay(new Vector3(Screen.width/2,Screen.height/2));
  • Use layers to have certain materials ignore light sources (ie. TV Screen), then use a Self-Illumin shader to brighten this material.
  • If you can get someone else to model for you, do it. It speeds up development :)

To check out the demo click here.

To get the source (unitypackage) click here.

Source Requirements: Unity 2.6, but you will still need Unity Pro to use the Render Texture feature.

Render to Texture Unity3D

December 11, 2009 by Devin Reimer

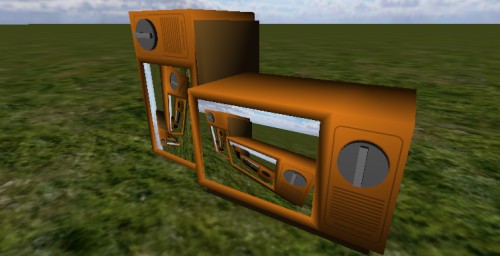
Render Texture TV Demo Screenshot

I’ve been working with Unity for a while now so this article was long overdue. Initial I was planning on doing some entry level stuff, like what is a Rigidbody, adding materials, etc. As more and more good video tutorials began appearing online I decided that I would do something a little more advanced than that. Don’t worry it not much more advanced.

I recently purchasing Unity Pro and have been digging into some Pro only features. One of my favorites so far is Render Textures. Render Textures simply put allows you to render the output of a camera to a texture. More detail on Render Textures can be found here

For this example I modeled a TV in Blender (don’t laugh at the model it is my first) with an empty space for where the screen would be.

Steps in Creating a Working TV That Displays What You See.

  1. Add basic environment objects (ground, skybox, First Person Controller,lights etc)
  2. Import a tv model into Unity and place it within the scene
  3. Create a plane within Unity and position it within the TV model to be used as the TV screen (using Render Texture with planes is easiest).
  4. Right click within the Project panel to create a ‘Render Texture’
  5. Add a second camera as a child to the ‘Main Camera’ within the First Person Controller.
  6. Set the ‘Target Texture’ property of this camera to the newly created Render Texture.
  7. Add this texture to a material
  8. Add this material to the tv screen
  9. Hit play and you should have a working TV

Hints and Gotchas:

  • You will need to rotate the render camera 180 degrees on its z-axis so that it will render the scene the right way up Update: Incorrect, looks like I had my rotations messed up. If the plane you are rendering to is rotated correct the render material will appear the right way up.
  • You will need to use at a least two cameras when using Render Texture because the camera that is rendering to screen can not also render to a texture
  • If you have added a Skybox to your main camera you will need to add this Skybox to the render camera(s).
  • If you have multiple cameras it may be easier to set the Skybox material within Render Settings instead of setting each camera’s skybox individually.

To check out the demo click here

To get the source click here

Source Requirements: You will need need Unity Pro to use the Render Texture feature.

Update: I have released an update version of this demo that includes object interaction. http://blog.almostlogical.com/2010/01/04/interacting-with-objects-unity3d/

Flash Developer to Unity3D Developer – Where should I begin?

November 6, 2009 by Devin Reimer

Flash Developer To Unity Developer

I’m a Flash Developer and a few months ago I decided to start doing Unity development. If you don’t know what Unity is or why I am developing in it, you can read about my decision to start working with Unity in my previous post.

Before I start posting example projects and code for Unity, I thought I would put together some steps on what I think would be the best way to learn Unity if you are a Flash Developer.

1. First download Unity (it’s now free) and play around with the pre-installed demo.

2. Learn the Unity interface basics.
http://unity3d.com/support/documentation/Manual/Learning%20the%20Interface.html

3. Watching the first three video tutorials in the ‘Unity for Flash Developers‘ series by the guys over at Ethical Games.
The other videos are also good, but I think one should get a little more experience with Unity before watching them.

4. While this may sound stupid, stop working with Unity and learn Blender (or another piece 3D model software). I wish I would have learned basic Blender skills earlier then I did. I found that not being able to create basic models was a major sticking point even when all I wanted to do was code.
I would recommend going through ‘Blender 3D: Noob to Pro‘ wiki tutorials.

If you read up until ‘Detailing Your Simple Person 2’ in Chapter Two you should have the skills required to work within Unity a little more comfortably. Once you become more familiar with Unity I would then carry on with the tutorials from where you left off.
Note: I found the learning curve for Blender insanely steep, so chances are you will to. Don’t lose hope to soon as after a little while Blender does become second nature even for a programmer like myself.

5. If you don’t already know C#, learn the basics. There are lots of general C# tutorials and they are pretty easy to find. I recommend coding in C# instead of Javascript as it is a much more robust language and will lead to a more structured project. While coming from a AS3 background it may seem like Javascript would be the logical choice, don’t be fooled. Spend the time and learn C#.

6. Get a copy of Visual Studio Professional and it you don’t know how to use it, learn it. Unity 2.6 now has Visual Studio integration which will save you a lot of time.

7. Go through the Official Unity FPS tutorials and convert them from Javascript to C#.
http://unity3d.com/support/resources/tutorials/fpstutorial
It’s hard to learn how something works by just copying and pasting. That is why I found converting these tutorials from Javascript to C# very helpful in learning how to code in Unity.

8. Follow the community on Twitter. Great tutorials, links and information are just a few follows away.

9. Go crazy and have fun. While learning Unity might take you a little while the process and final result are both very rewarding.

Finally if something helped you go from Flash Developer to Unity3D Developer and I haven’t mentioned it here, add a comment below.

Unity3D – You're Stealing my Free Time and I Love It

September 7, 2009 by Devin Reimer

Unity Title

If someone 3 months ago would have said to me, do you see any reason why you would stop devoting so much time to Flash/Flex in the next year. I would have said not a chance. I love interactive content on the web and more specifically interactive 3D within a browser. I have long history with AS3 and the only other “competitors” (Silverlight and HTML5)  aren’t capable of what I would need them to do.

My world got turned upside down the day I was shown the Unity Web Player. I froze, my jaw dropped, this was amazing. I had seen demos of Unity before in presentations about iPhone development, but this was different, this was in a browser. Most importantly it meant I could program full 3D in C# for the web.  So I went back to my original list of reasons why I was not interested in Unity the first time I saw it. Firstly it was really for iPhone and Wii development at the time, but now it’s also for the web.  The next reason being, I didn’t own a Mac. After doing some reading I realized that sure enough the Unity guys have dealt with that, the editor was now available for Windows. My last reason was price, but since this tool is so great I could deal with the price. In theory I would be in, but there was one other reason that hadn’t occurred to me. What about the thousands of hours I’ve put into AS3 development. Separation anxiety, going from a place where I know so much, to a place where I know nothing.

After a week of thought on the topic, I decided that Unity3D development was what I had to do. This was what I was waiting for, it just didn’t come in the form of a new Flash Player release. It has been roughly a month since the shift in my spare time over to Unity3D and I couldn’t be happier, the power and the opportunities are incredible.

So this is why there has been a little drought in examples on this blog, Unity3D has stolen my free time. This does not mean nothing new is coming, I’m actually finishing up some JigLibFlash stuff as I write this (so clearly Unity3D hasn’t stole all my free time). I am also hoping in the coming months that I will have some Unity3D examples to put up on this blog.

If you haven’t already done so please go check out Unity3D now.

I have one final comment and it is for Adobe: I know your plan is to unify the mobile player with the web player. In doing this you are slowing down the advancement of the web player to a point that by the time you have them ready to unify, there might not be anything left to unify.