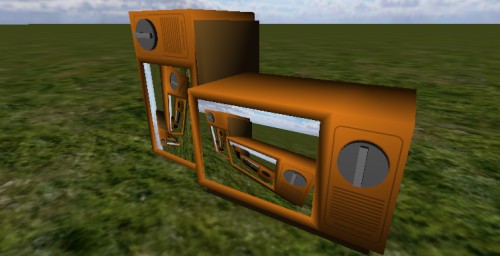
I’ve been working with Unity for a while now so this article was long overdue. Initial I was planning on doing some entry level stuff, like what is a Rigidbody, adding materials, etc. As more and more good video tutorials began appearing online I decided that I would do something a little more advanced than that. Don’t worry it not much more advanced.
I recently purchasing Unity Pro and have been digging into some Pro only features. One of my favorites so far is Render Textures. Render Textures simply put allows you to render the output of a camera to a texture. More detail on Render Textures can be found here
For this example I modeled a TV in Blender (don’t laugh at the model it is my first) with an empty space for where the screen would be.
Steps in Creating a Working TV That Displays What You See.
- Add basic environment objects (ground, skybox, First Person Controller,lights etc)
- Import a tv model into Unity and place it within the scene
- Create a plane within Unity and position it within the TV model to be used as the TV screen (using Render Texture with planes is easiest).
- Right click within the Project panel to create a ‘Render Texture’
- Add a second camera as a child to the ‘Main Camera’ within the First Person Controller.
- Set the ‘Target Texture’ property of this camera to the newly created Render Texture.
- Add this texture to a material
- Add this material to the tv screen
- Hit play and you should have a working TV
Hints and Gotchas:
- You will need to rotate the render camera 180 degrees on its z-axis so that it will render the scene the right way up Update: Incorrect, looks like I had my rotations messed up. If the plane you are rendering to is rotated correct the render material will appear the right way up.
- You will need to use at a least two cameras when using Render Texture because the camera that is rendering to screen can not also render to a texture
- If you have added a Skybox to your main camera you will need to add this Skybox to the render camera(s).
- If you have multiple cameras it may be easier to set the Skybox material within Render Settings instead of setting each camera’s skybox individually.
To check out the demo click here
To get the source click here
Source Requirements: You will need need Unity Pro to use the Render Texture feature.
Update: I have released an update version of this demo that includes object interaction. http://blog.almostlogical.com/2010/01/04/interacting-with-objects-unity3d/


9 Responses to "Render to Texture Unity3D"
To save the additional rendering of that extra camera, you could also make sure that the resolution you render to matches the screen, and then simply have a plane with the render-texture in front of the second camera, which would be set to ignore everything else (using layers). Would only matter in case you’re rendering a lot of stuff, but then why wouldn’t you?
Enjoy!
@David Thanks for the feedback, I will try to incorporate those changes into my next version which hopefully is coming soon.
is it works for android?
Yes, as long as you are using Unity pro.
Hi!
I have used your tutorial to create my rearviews, when I créateur the exe of my project my rearviews appear with the res color. But when I play the scene with unity everything is ok…
Do you know what is the problem ?
Thank you
I have noticed you don’t monetize your blog, don’t waste your traffic, you can earn additional bucks every month because you’ve got hi quality content.
If you want to know how to make extra money, search for: Boorfe’s tips
best adsense alternative